E-Fence: Set Up
To Learn More about the PATHFINDER2 E-Fence Setup: Click here

Creating the E-Fence: Click on Set E-Fence Boundary.

Setting the Near Fence Zone Boundary:
- The GPS collar will vibrate when it enters the “Near Zone” prior to stimulating at the boundary. You can set the desired value between 5-15 yards (meters) and click ‘Save’.

- Outer and Inner Fences are set according to the configured ‘Near Zone’ distance, which will be displayed at the top. If you would like to change the ‘Near Zone’ distance, you will have to start over. When arranging the boundary, please ensure to have sufficient safe area for your dog.
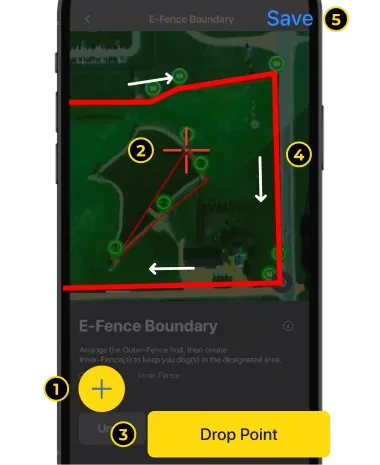
Setting up Outer Fence:
- Press the (+) button for the Outer Fence.
- Move the map and place the [CROSSHAIR MARK] on the desired area.
- Click ‘Drop Point’ to create a point for the fence boundary.
- Repeat the process above to complete the boundary. Create the fence so it goes in one direction.
- Click the Save button on the top right. Only one can be saved.
- You can create 1 Outer-Fence and 3 Inner-Fences. All fences can use up to 15 points.

Setting up Inner Fence
- The Outer Fence must be created first to create the Inner Fence.
- Press the (+) button for the Inner-Fence.
- Drag the area of the map you want to create the fence to the center with the [CROSSHAIR MARK].
- Click ‘Drop Point’ to create a point for the fence boundary.
- Repeat the process above to complete the boundary. Create the fence around the boundary in one direction to avoid any cross overs.
- Click the save button on the top right. Three can be saved.
- You can create 1 Outer-Fence and 3 Inner-Fences. All fences can use up to 15 points.

Syncing E-Fence Boundary to the Receiver In order to operate the E-Fence, the receiver must be synced.
- Turn the receiver on near the smartphone.
- Press the Sync E-Fence Boundary button.
- Look at the list to make sure the receiver is synced.
NOTES
- After changing the E-Fence boundary, you must sync it again.
- Each receiver must be synced individually in order for the E-Fence to operate.

Applying Stimulation on the Receiver
- Press the ▼ button for the receiver on the menu.
- Set the stimulation level.
- Press update.
NOTES
Go to E-Fence Settings to press the Activate button to turn the E-Fence operation on or off for each receiver.
Go to E-Fence Settings to press the Activate button to turn the E-Fence operation on or off for each receiver.

E-Fence Settings
- Set the E-Fence settings by going to MENU / SETTINGS / E-FENCE.
- You can create an alarm for both exiting and entering the E-Fence.
- You can select different alarm types.
Did it help ?
Didn't find what you were looking for? Try looking on the FAQ